Veggie Frittata

DSC_0143

Right now I have a bit of a love-hate relationship going with eggs. They are an incredibly cheap, quick, and easy source of good protein and I eat them just about every day. But whoever thought it was a good idea to carry your eggs around in a thin plastic bag? I can definitely count on one hand the number of times I have made it home without cracking a single egg. Whether knocking the bag of eggs hanging from my bicycle handle with my knee as I ride home, swinging too wide and cracking a few eggs against a door frame or simply having the bottom of the thin plastic bag give out and leaving a nice scramble of raw eggs on the sidewalk, I almost never make it home with a full bag of perfectly intact eggs. But that just makes for quite a victory when I do.

DSC_0066I like this recipe because it is a simple way to get protein and veggies in one dish. You can use any vegetables that you like. I threw in a mix of onions, red pepper, zucchini, broccoli and cauliflower but don’t be afraid to mix it up and try out other combinations of vegetables.

DSC_0080Depending on the size of the pan that you use, 3-4 cups of raw veggies is a good amount to shoot for. Go ahead and sautee the vegetables for about 3-5 minutes, until they are partially cooked.

DSC_0089

Whisk up the eggs and seasonings before slowly add the vegetables to the egg mixture a bit at a time. Mix in between additions to keep from cooking the eggs with the heat of the vegetables.

*The amount of cholesterol in one egg yolk is almost equivalent to the full daily recommended limit so I typically decrease the number of yolks that I include in my eggs to a ratio of about 1 yolk to every 3 or 4 egg whites. If you decide to try this, it may take a little getting used to but you can slowly decrease the amount of egg yolks depending on your taste. 

DSC_0097Pour the egg mixture into a baking pan. I used a 9 inch round cake pan and it was the perfect size for the 14 eggs and about 4 cups of vegetables that I used.

DSC_0102

The frittata is great just as is, but I topped mine with a few slices of tomatoes and a bit of mozzarella. Any kind of cheese would work great if you want to shred or grate a bit on top.

DSC_0143Bake for 35-40 minutes or until cooked all the way through.

DSC_0155I am a fan of breakfasty foods anytime of day so why not enjoy this dish for any meal?–breakfast, lunch, or dinner!

Ingredients

14 eggs (4 whole eggs and 10 egg whites)

4 cups raw vegetables

1/2 Tbsp Italian seasoning (or any other seasoning of choice)

1 tsp salt

1 tsp pepper

Directions

1) Preheat oven to 150O C.

2) Dice up vegetables and sautee on the stovetop for 3-5 minutes or until partially cooked.

3) Beat eggs and seasonings together. Slowly add vegetables to egg mixture, whisking in between each addition.

4) Pour egg and vegetable mixture into baking dish. Bake for 35-40 minutes or until completely cooked.

African Chicken Stew

DSC_0914

There is a story behind this soup. It was actually quite an accident that I even ended up making it, but I am so glad that I did. When you see the ingredient list you may think it is a strange mix of things to throw into a soup. I was not sure how it would turn out myself, but in my opinion, this one is definitely a keeper. It’s a super easy recipe and a nice change of pace from your typical soup.

Now for the story…

So, sometimes my roommates and I do a really good job of meal planning for the week and we each take a different night of the week to cook for each other. This particular week, I had a cornbread recipe I wanted to try out so I decided I’d do my best to pull off a chili and cornbread meal. I was definitely looking forward to it. It’s as cold as can be outside these days so what is better than warming up with a  bowl of hearty chili and cornbread? Well, it was the day before I was supposed to cover dinner and I realize that we are totally out of beans and you just can not make chili without beans. Around here, we do beans the good ole fashioned way — soak them overnight and cook them all day — so obviously I had a problem on my hands. I looked at the clock. Thirty minutes to spare before I was supposed to head to a friend’s house for dinner. I started doing the math in my head. Six minutes to get to the market on my bike, three minutes to run in and buy beans, four if I am being generous, and another six minutes to get back. I could do it. I was committed to this chili. Mostly because I really wanted to try my hand at this cornbread.

I made it to the market and back home in about the time I had estimated. Mission accomplished! I pulled out a bowl to start soaking the beans before I headed out for dinner. Then it happened — that “are you serious” moment. I could not believe it. In the rush of it all, instead of buying beans I had somehow managed to by a jīn of peanuts. PEANUTS! Had I really been that scattered brained? There was nothing to do but laugh it off.Chili and cornbread would have to wait until another day. I was in need of a Plan B. I know I could have used the peanuts for something else but, not only was I in the mood for something warm and hearty, I was interested to see how I could work them into my meal, considering all I had been through. So that it is how I came across this soup. I know what you’re thinking…“Peanuts?  In a soup?” Just give it a try.I hope you enjoy it as much as I do. Feel free to share your own crazy experiences. It is good to know I am not the only one who has moments like this.

DSC_0818

This soup is really so simple and easy to make. Mostly just takes lots of dicing and dumping things into a pot.This recipe calls for 3-4 medium sweet potatoes. For some reason, I seem to only be able to find sweet potatoes that are either gargantuan in size or itty bitty two-bite potatoes. So I just used two fairly large ones.

P.S. was anyone else as surprised as I was by the sweet potatoes out here? They are definitely not the same out here as they are in the States. They tend to be fairly dry and require a little extra work to cook and prepare them well. But I am not complaining, I still really love them and cook with them quite often.
DSC_0837

I have to admit, I considered leaving the ginger out of this recipe.  It is not always my favorite flavor and it is already used often enough in Chinese cooking. But I decided to stick to the recipe and go ahead and throw it into the mix. Even if you are not a big ginger fan, I recommend not skipping out on it. Combined with everything else, you end up with a really great flavor that you could not get without it. And you have no excuse for not being able to find it out here!

DSC_0865

You’ll want to go ahead and cook up the chicken before putting all the ingredients together to simmer. I almost always choose chicken breast any time I eatchicken. It is a great source of lean protein and funny enough, at the market I shop at here in China, it is cheaper than most other parts of the chicken. 

DSC_0881

The recipe calls for one 15 oz can of diced tomatoes, which is about 2 cups of diced tomatoes. You can sort of ball park it. Feel free to add more or less.

DSC_0886DSC_0890DSC_0891

Continue to add the rest of the ingredients.

Let simmer for at least an hour or until the sweet potatoes are soft.

Stir in cilantro just before serving. 

This soup is great on it’s own but also goes well with rice.

DSC_0914

Makes about 6 servings

Ingredients

2 large chicken breast

1 medium onion, diced

3-inch piece of ginger, peeled and minced

6-8 garlic cloves, chopped roughly

3-4 medium sweet potatoes chopped

2 cups medium tomatoes chopped

8 cups chicken broth (I mix about 1 1/2 Tbsp of chicken bouillon granules with 2 cups of water)

½ cup peanut butter 1 cup roasted peanuts

1 Tbsp ground coriander

1 teaspoon cayenne pepper

Salt and black pepper to taste

1/4 to 1/2 cup of chopped cilantro

Directions

1) Heat a small amount of oil in a skillet set over medium-high heat. Sautee chicken and set aside once fully cooked.

2) Next, sautee the onions, garlic and ginger 3-4 minutes adding more oil if necessary.

3) In a large soup pot, add the chicken, chicken broth, crushed tomatoes, peanut butter, peanuts, coriander and cayenne and stir well to combine. Bring to a simmer and taste for salt, adding more if needed. Cover the pot and simmer gently for 90 minutes (check after an hour), sweet potatoes are tender.

4) Add the seasonings and adjust to fit your taste. Stir in the cilantro and serve.

Pumpkin, Pumpkin, Pumpkin and Pie

So, I kind of a have a thing for pumpkin. Like a big thing. I don’t really know why I love it so much, but I do. Maybe it is because pumpkins are typically associated with fall and fall is definitely my favorite time of year. Nutritionally, pumpkins have a lot to offer, being low in calories (less than 50 calories per cup), high in fiber, Vitamin A and other crucial vitamins and minerals.

DSC_0464

I don’t know about other parts of China, but rumor is you can get pumpkins pretty much year round here! This is good, it means I can pace myself instead going pumpkin crazy for only a month or two.  Although you can get canned pumpkin here, it can be fairly expensive. I realized that canned pumpkin was not going to be a sustainable way to get my pumpkin fix, especially when fresh pumpkins are so easy to come by.

DSC_0454

One night at a friend’s house, she had one of these the long, skinny, tan colored pumpkins sitting out. She said that she almost always buys these instead of the typical small round orange ones because the taste and texture are so much better. I was a bit skeptical but she told me to give it a try for myself. Man, was she right! I may never go back to buying any other kind of pumpkin. If you haven’t tried these yet then I highly recommend you do and see what you think! All that said, any other kind of pumpkin will work just fine as well.

DSC_0473

Cooking and prepping a fresh pumpkin takes a bit of time and effort but it is so worth it. First, just start by cutting the pumpkin up into smaller pieces. There really is no science to this part. I usually cut mine into three or four pieces and then cut those each lengthwise. You’ll want to scoop out all the seeds before baking. You can toss the seeds or hang onto them for roasting and snacking on.

DSC_0493

Lay the pumpkin pieces on a baking pan and add about an inch of water. Bake at about 375 °F (190 °C) for 30-40 minutes or until pumpkin is completely soft.

DSC_0516

Let the pumpkin cool and then peel off the skin. It should come off easily, but you may need to use a knife.

DSC_0536

Mashing the pumpkin works just fine but I usually like to put my pumpkin through a blender for just a few seconds to get it nice and smooth. Now you have delicious cooked pumpkin that you can use just like you would canned pumpkin! You can make muffins and cookies or add a scoop to smoothies and oatmeal for a fall spin on your normal morning routine.

DSC_0621

The first thing I did with this pumpkin was use it to make a pumpkin pie for our big Thanksgiving meal we had last week with a few friends. I realize this post is a little late for Thanksgiving, but who says that’s the only day you can bake a pumpkin pie, right?

One thing you’ll learn about me is that I am often looking for ways to make a recipe healthier while still tasting great. This was my first time to try this pumpkin pie recipe and it turned out well. I found it on a website called www.eatbetteramerica.com that has lots of tips for how to “healthify” recipes.

DSC_0213

DSC_0218


For the crust, you start by adding all the dough ingredients, except for the milk, and mixing until it forms small crumbles. Then add the milk a tablespoon at a time until a good dough-like consistency forms. I ended up adding 4 tablespoons of milk.

DSC_0221

Then press it into the pan, covering the bottom of the pan and pressing it up the sides of the pan. This is one of the few recipes I have ever used that doesn’t call for you to bake the crust before adding the filling. If you wanted to, you could pop it in the oven for 10 minutes or so while you are mixing up the filling.

DSC_0229

So I know I said most of my recipes wouldn’t require a trip to the import store, but you’ll need to have evaporated milk on hand for this recipe. I found this for about 7 元, so hopefully you can find it relatively inexpensive as well. Our kitchen still lacks a can opener, which is typically not a problem, but good thing for this handy-dandy swiss army knife that helps get the job done.

DSC_0236

The recipe calls for one 15 oz can of pumpkin, which is about 2 heaping cups of fresh pumpkin. This doesn’t have to be exact.

DSC_0242

As far as the pumpkin pie spice goes, you may or may not have any. We had some up until about 2 weeks ago, so I found a homemade version that calls for:

–4 Tablespoons ground cinnamon

–4 teaspoons ground nutmeg

–4 teaspoons ground ginger

–3 teaspoons allspice

DSC_0019

I have found cinnamon sticks at just about every market I’ve been to. If you have a coffee grinder or a blender attachment that grinds well you can grind your own spices. And I have found ground ginger at grocery stores and xiǎo mài bùs with all the other seasonings.  I didn’t have allspice so I had to leave it out but the flavor of the pie still turned out well.

DSC_0243

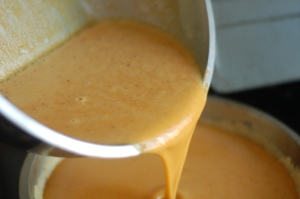
Pour the pie patter into the pan, bake, let the pie cool for at least and hour and then ENJOY!

Pumpkin

Pastry

1 1/4 cups Gold Medal® all-purpose flour

1 teaspoon sugar

1/4 teaspoon salt

1/4 cup vegetable oil

3 to 4 tablespoons fat-free (skim) milk

Filling

3 egg whites

1/2 cup sugar

1 1/2 teaspoons pumpkin pie spice

1/8 teaspoon salt

1 can (15 oz) pumpkin (about 2 cups fresh pumpkin)

1 can (12 oz) evaporated fat-free milk

½ teaspoon vanilla

Directions

1) Heat oven to 425°F (About 220°C) . In medium bowl, mix flour, 1 teaspoon sugar, 1/4 teaspoon salt and the oil with fork until well mixed. Stir in milk, 1 tablespoon at a time, tossing with fork until all flour is moistened and pastry almost leaves side of bowl. Shape pastry into a ball, using your hands. Press pastry in bottom and up side of 9-inch glass pie plate.

2) In medium bowl, beat egg whites slightly with wire whisk or egg beater. Beat in remaining filling ingredients. Pour filling into pastry-lined pie plate; place on oven rack. Bake 15 minutes.

3) Reduce oven temperature to 350°F (175 °C). Bake about 45 minutes longer or until you can insert a knife and pull it out cleanly.

4) Let pie cool for at least 1 hour before serving. After cooling, pie can remain at room temperature up to 5 more hours, then should be covered and refrigerated.
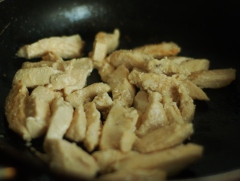
My China Kitchen

This is my China kitchen.

Image

Image

As I spend time in different homes here in China, I think it’s safe to say that you will be hard pressed to find any two kitchens that are alike. Typical kitchen appliances and accessories are not always easy to come by, which means you often have to get creative and make do with what you have. This kitchen definitely has it’s quirks and my roommates and I have had our fair share of interesting experiences in our beloved China kitchen. Just to name a few….

–We spent our first few weeks doing dishes by flash boiler due to the incredibly weak water pressure streaming out of our sink faucet.

–Happened to run out of gas for our stove during Mid-Autumn festival and were told by our “gas man” that he could come refill it in a week. Needless to say, it took longer than a week to get it refilled.

–Burned out a blender trying to blend up a morning smoothie. Yes there was smoke and all…China still has much to learn in the way of quality blenders.

–Lost electricity mid-meal and proceeded to finish cooking by candlelight.

–And of course, there is the stinging smell of neighbors cooking garlic, onions, and ma peppers frequently pouring through the vents from nearby apartments.

There are very few surprises left for our kitchen to throw at us that we won’t be ready to face. I have to admit, there are days when I meet these challenges with more or less eagerness but to all you who have experienced the ups and downs of your own China kitchen…

Jiā yóu 加油!

As challenging as cooking can be in my China kitchen, I am thankful for all that I do have. And really, how can I complain when I can look out my kitchen window any time of day and catch this fantastic view. Seriously.

Image

So let’s get cooking!